Development Environment Setup
Apps in GIRAF are developed using Flutter. The setup of the development environment is described below. It can be used by Windows, Mac and Linux users.
Downloading and Installing Flutter 3.3.8
- Go to flutter.dev and select
your operating system and 3.3.8 version of flutter which has been tested and is guaranteed to work with the GIRAF project.
- Make sure you have Git installed.
- For Mac: Make sure you have the listed command-line tools available.
- For Linux: Make sure you have the listed command-line tools and shared libraries available.
- Follow the instructions on how to download and unzip Flutter.
- Update your path according to the instructions.
Android Setup
-
Download and install Android Studio.
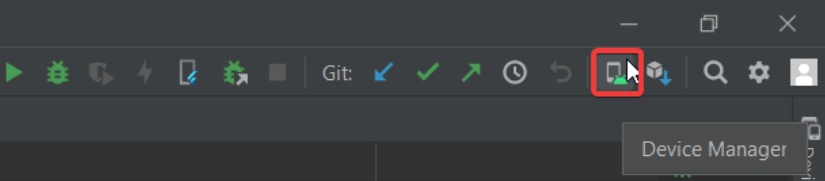
- On Windows setting up a virtual device with Android Studio is quite simple: In Android Studio, click the “Device manager” button in the top right corner.
Create a new device by clicking Add Virtual Device in the bottom right corner of the popup.
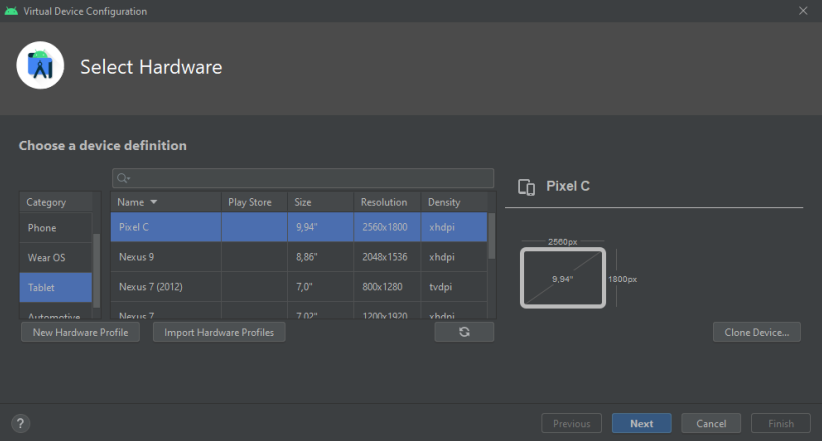
As the GIRAF weekplanner app is supposed to be used on a tablet, it makes the most sense for you to have a tablet virtual device.
Choose tablet in the category tab and choose any device, e.g., pixel C
Choose an android version to run on your virtual device e.g., android R API level 30.
After finishing the installation, confirm that your virtual device works. Go to AVD-manager and click the green arrow in the row of the virtual device you want to start.

- On Mac Install android-sdk
brew install android-sdkTo ease the use of Android please add the following to your environment variables: A new variable called ANDROID_HOME, which should point to your Android installation directory (It will probably be located at "~/Library/Android/sdk) and a new path to your PATH variable, which should point to the sdk/platform-tools and sdk/cmdline-tools/latest/bin folder of your Android installation. Install dotnet 6.0, if not done automatically then add the .dotnet/tools to your PATH. Install additional libraries. Use the following commands to install needed libraries for dotnet:/bin/bash -c "(curl -fsSL https://raw.githubusercontent.com/Homebrew/install/HEAD/install.sh)"andbrew install mono-libgdiplusInstall MySQL Server 8.0 or run this command:brew install mysqlWhen installing/setting up set the root user's password to password. Install android system image and tools:
For x86-64 macs:
sdkmanager "platform-tools" "platforms;android-33" “emulator” “extras;google;auto” “system-images;android-33;google_apis;x86_64” “system-images;android-33;google_apis_playstore;x86_64”For ARM macs:
sdkmanager "platform-tools" "platforms;android-33" “emulator” “extras;google;auto” “system-images;android-33;google_apis;arm64-v8a” “system-images;android-33;google_apis_playstore;arm64-v8a”Create virtual device (Pixel C with device id 27, which is a tablet):
For x86-64 macs:
avdmanager create avd -n pixel_c -k “system-images;android-33;google_apis;x86_64” -d 27For ARM macs:
avdmanager create avd -n pixel_c -k “system-images;android-33;google_apis; arm64-v8a” -d 27Set the available RAM for the virtual device to 2GB
emulator -avd pixel_c -partition-size 2048 -wipe-dataUse the keyboard to type instead of the emulated touchscreen
Navigate to /Users/you/.android/avd/pixel_c.avd
Use a text editor to edit “config.ini”
Find the line that says
hw.keyboard=noChange it to
hw.keyboard=yes- On Ubuntu there was a problem with the newest version of Android Studio throwing weird Java errors when you would try to build. It worked with version 4.0.2. You can download any version from their Android Studio Archive.
-
If you have an Android device, enable USB debugging and plug it in to your computer.
- For Windows: You might need to install the Google USB Driver.
- Setup the Android emulator and run it.
Do a test run
To make sure everything is as it should be, run the command flutter doctorin a terminal.
The first time you do this, it should give a warning at the Android tool-chain step that you need
to accept android licenses. Do this by running the command flutter doctor --android-licenses.
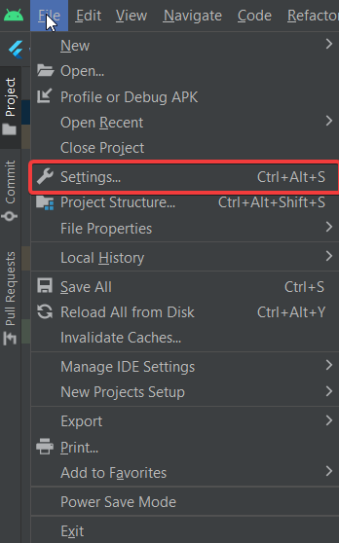
If you get any errors, go to File→Settings
Now direct to Appearance & Behaviour→System Settings→Android SDK, then go to the SDK-tools tab.
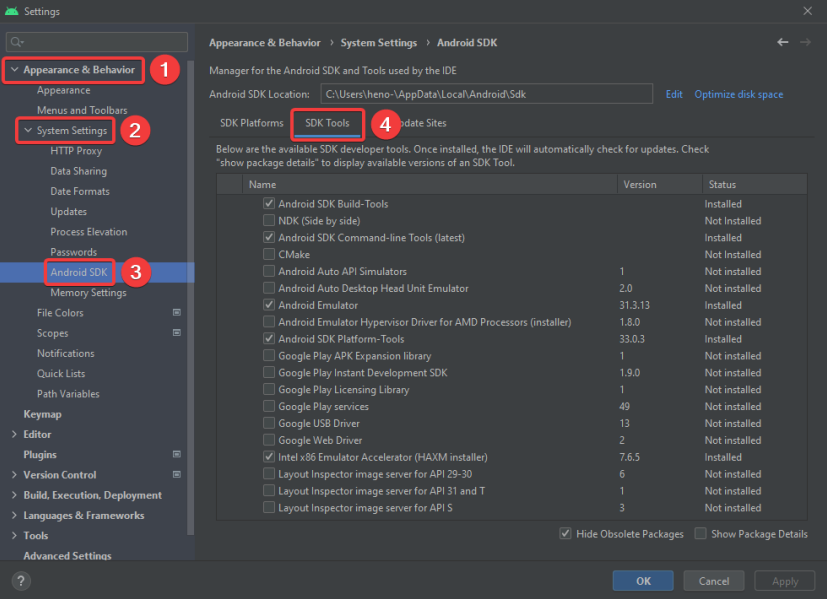
Here make sure that you have the newest versions of at least Android SDK buildtools, Android Emulator, Android SDK platform tools, Intel x86 emulator accelerator and Andorid SDK Command-line Tools.
When flutter doctor is happy, launch your android or iOS virtual device. It should now show up in flutter devices. Select it and click Run (the green arrow right of flutter devices)
The GIRAF weekplanner app should then start compiling, this may take several minutes, and even longer the first time. When it is done, it should print something along the lines of “Syncing files to device sdk gphone x86 arm..”. in the Run console, and the app will be launched in your emulator.
- For MacOS using iOS emulator: If you get an error related to pod install, try deleting the file weekplanner→ios→Podfile
Using the android emulator without Android Studio
We found it especially useful to use other IDE’s than Android Studio while using the emulator outside Android Studio, so here is a guide on how to run the emulator outside Android Studio.
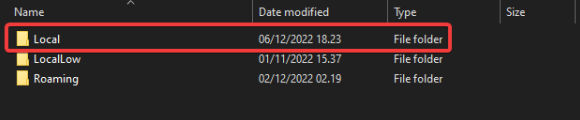
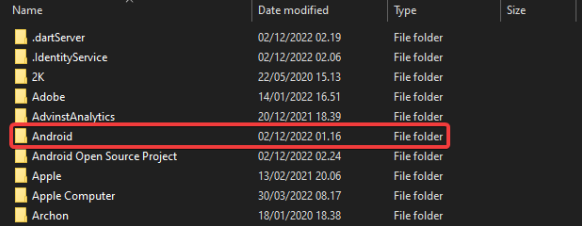
- Windows: First of all, search for
%appdata%in the search bar and open the appdata folder.
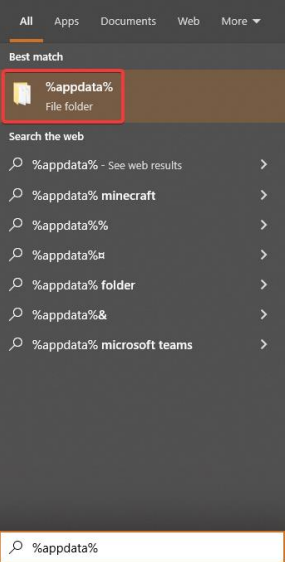
Now exit the “Roaming” folder and enter the “AppData” folder

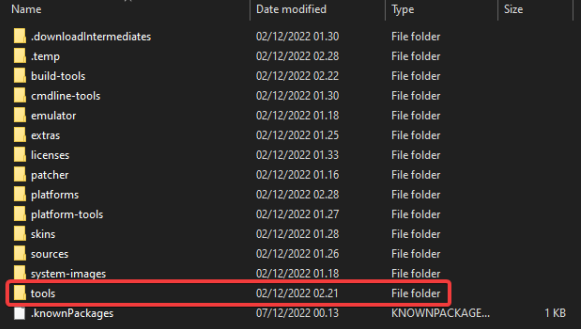
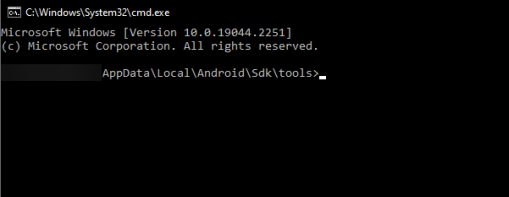
Once you are in this folder, locate to “\Local\Android\Sdk\tools”.

Now once you have made your way to this folder, go into the directory and type “cmd”. This
should open a command prompt at this location.


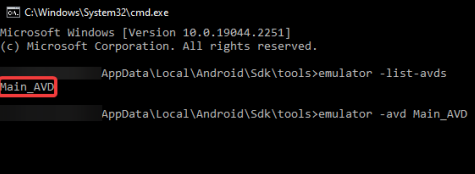
you have the command prompt open at the specified location, type in “emulator -list-avds”. This should return a list with the name of the AVD you have created.
After this, run the command “emulator -avd <YOUR_AVD_NAME>”.
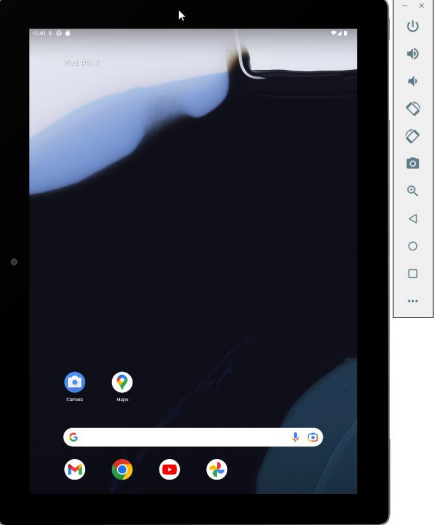
This should launch your virtual device.
You are now ready to run the weekplanner. IDE´s such as Visual Studio Code should automatically recognize that you have an AVD running.
Random issues we found
This section is for minor issues we found when setting up GIRAF. You might not encounter any of these issues.
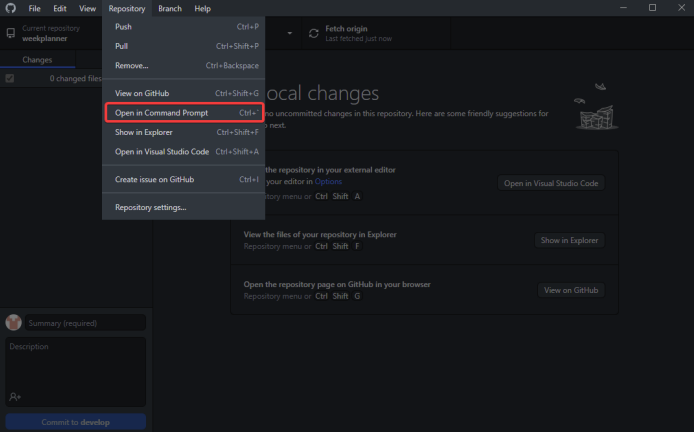
- Using GitHub to open command prompt and run flutter: We found out that opening your command prompt via. the option on GitHub, causes your flutter commands to not be recognized.
However, this problem can be fixed by either restarting your computer to allow your user path
variables to take effect or simply locating the weekplanner folder manually and then typing
“cmd” in the directory.
iOS and iPadOS Setup - MAC ONLY
- Download the latest version of Xcode from the App Store.
-
Setup the command line tools, to use the new version of Xcode you just installed:
bash sudo xcode-select --switch /Applications/Xcode.app/Contents/Developer sudo xcodebuild -runFirstLaunch -
Also make sure you have accepted the license agreement:
bash sudo xcodebuild -license -
You can open the simulator app by finding it with spotlight, or by running:
bash open -a Simulator -
If you want, run the following command to allow full screen mode:
bash defaults write com.apple.iphonesimulator AllowFullscreenMode -bool YES -
Install cocoapods:
bash
sudo gem install cocoapods
pod setup
Personal Apple Developer Account
To get a personal Apple Developer account, you need to follow the following steps.
- Launch Xcode.
- Invoke Xcode > Preferences (⌘+,).
- Go to Accounts, and add one by clicking the + icon. Sign in with your Apple ID.
- Select your account and click Manage Certificates and then click the + icon.
You now have an Apple Developer certificate. You may need to add new ones once in a while, but just follow steps 1, 2 and 4.
Now you need to add yourself as a developer to the Flutter project. To do this, you need to open the project in Xcode.
- Open a new project in Xcode with File > Open (⌘+O) and locate
the
iosfolder. This is the one you should open. - Now you should be able to see the two folders
RunnerandPodsin the left column. Double click onRunnerand click on Signing & Capabilities. - Here you need to add yourself as the team. You also need a unique Bundle Identifier, so just write some string that is unique.
If you want to deploy to a physical iOS device, you need to first accept your computer (when connecting to a device), and then accept yourself on the device as a developer. After building the project in Xcode to your device, you should go to Settings > General > Device Management and add yourself as a trusted developer.
Note that Device Management option only appears after the project is build. There, you need to select and trust yourself as a developer.
Setup Your IDE
IntelliJ and Android Studio
- Start IntelliJ/Android Studio.
- Open plugin preferences.
- Windows/Linux: File > Settings (Ctrl+Alt+S) > Plugins.
- MacOS: IntelliJ IDEA > Preferences (⌘+,) > Plugins.
- Select Marketplace, find the Flutter plugin and click Install.
- Click Yes when prompted to install the Dart plugin.
- Click Restart when prompted.
Visual Studio Code
- Start VS Code.
- Invoke View > Command Palette (Ctrl+Shift+P/⌘+Shift+P).
- Type "install" and click on
Extensions: Install Extensions. - Type "flutter" in the extensions search field, select Flutter in the list, and click Install. This also installs the required Dart plugin.
Verify Setup
- Run
flutter doctorto verify that everything is setup properly: Note: You only need checkmarks for the IDE that you use for Flutter.
Compiling and Running
IntelliJ and Android Studio
- Invoke File > Open and select the root folder of the project.
- Open
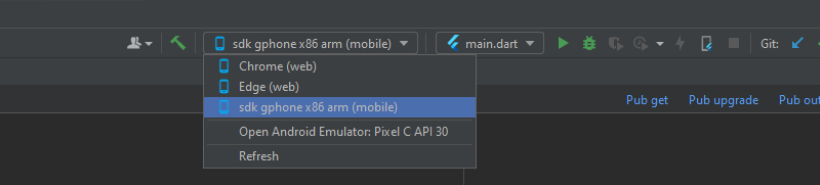
/pubspec.yamland press Packages get. - Select an Android/iOS virtual device or the Android/iOS device in the toolbar.

- If the virtual device doesn't show up in the IDE toolbar, and the "Open
Android Emulator: …" option is not shown, use
flutter emulatorsto list available emulators and then runflutter emulators --launch <emulator id>to launch it. It should then appear in the toolbar.
- If the virtual device doesn't show up in the IDE toolbar, and the "Open
Android Emulator: …" option is not shown, use
- Make sure that
main.dartis selected as the run configuration. - Press
 to run without debugging or
  to debug.
 - While the app is running, save files or press
 to apply the changes instantly.
- Some changes requires using hot restart (
 ).
See docs for more
information.
).
See docs for more
information.
- Some changes requires using hot restart (
Visual Studio Code
- Invoke File > Open Folder (Ctrl+K Ctrl+O/⌘+O), and select the root folder of the project.
- Invoke View > Command Palette (Ctrl+Shift+P/⌘+Shift+P).
- Type "Flutter" and click on
Flutter: Packages Get. - Locate the VS Code status bar:

- Select a device.
- If no devices are available and you want to use a virtual device, click on No Device and select a virtual device to start.
- Otherwise, make sure that your physical device is connected and setup properly.
- Go to the Debug and Run menu (
 ).
). - Press Create a launch.json file.
- Invoke Debug > Start Debugging or Debug > Run without debugging as normal.
- While the app is running, save files or press
 to apply the changes instantly.
- Some changes requires using hot restart (
 ).
See docs for more information.
).
See docs for more information.
- Some changes requires using hot restart (