Use of GitHub in GIRAF
As explained in the process manual of 2019, they changed from GitLab to GitHub.
This article will explain how GitHub is used in the 2020 GIRAF project.
Issues
Issues are created by the development teams as well as the PO group. An issue can be a bug report or a task creation request.
The PO group prioritises, assigns and adds milestones to issues.
The list of issues can be seen at each repository, eg. https://github.com/aau-giraf/weekplanner/issues , or a complete list for the whole organization.
Getting an Issue to Work on
If you have time to work on a new issue, you can get a new one by following these steps:
- Find an issue you want to work on
- Ask the PO group if you can work on that issue
- The PO group might say no for various reasons and they have the final say, as they have a better overview.
- There is usually a greater chance of getting a yes if the issue you've picked is either highest or high priority.
If you don't have a preferred issue you can ask the PO group to be assigned the most pressing issue, as they have a good overview of the project and they will most likely have some issues that they would like you to work with.
Creating an Issue
If you find a bug, or have a task creation request you can create an issue:
- Go the the "Issues" tab of the relevant repository (E.g. https://github.com/aau-giraf/weekplanner/issues).
- Press the green "New issue" button.
- Choose whether to submit a bug report or task creation request, and press "Get started".
- Create a title and description for the issue. Please follow the template, and
don't delete the headers!
- The title for the Task Creation Request should tell what functionality you would like added using the shown form "As a developer I would like the docker config file to automatically update so that I don´t have to manually update the config file". Instead of the task being for the developer, guardian or user is also frequently used.
- Label the issue with appropriate labels.
- It can be a good idea to inform the PO group when you are done, so they can assign and refine the issue.
Branches and Pull Requests
We follow the GitFlow Workflow as explained in the process manual of 2019.
During the sprints, all development is done in feature branches, branching out
from the develop branch.

The naming convention for feature branches is feature/xx where xx is
replaced by the issue number.
When the Release Preparation phase
begins, a release branch is created from the develop branch.
This branch is now used instead of develop until the sprint is over.
The naming convention for release branches is release/YYYYsXrZ where YYYY
is replaced by year, X with the sprint number and Z with the release number.
E.g. release/2020s1r1 for 2020, sprint 1, release 1.
Creating a Branch
During Sprints
When you start working on an issue, you create a branch from develop called
feature/xx where xx is the issue number.
From the terminal:
1 2 | |
Or from GitHub:
- Make sure
developis selected.
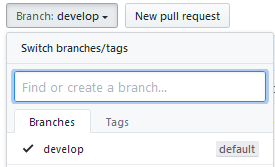
- Input the name of the branch (e.g. for feature 400).
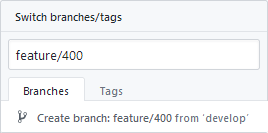
- Press "Create branch: feature/xx from 'develop'"
During Release Preparation
When you start working on a release fix, you create a branch from release/*
called releasefix/xx where xx is the issue number.
1 2 | |
Or from GitHub using the same procedure as above, but with the release branch as base instead, and with the release fix naming convention.
Creating a Pull Request
When you have finished your issue, it is time to create a pull request. A pull request is a request to merge your branch into another branch.
Before making the pull request, make sure that the code:
- Only relates to a single issue. (One PR per user story)
- Is fully tested.
- Is reachable when opening the application.
Fully tested means that if any piece of the functionality is removed, a test should fail.
Creating a pull request on GitHub:
- Open the "Pull requests" tab in the repository (e.g. https://github.com/aau-giraf/weekplanner/pulls)
- Press "New pull request"
- Select the appropriate branch as base.
developif during sprintrelease/*if during release preparation
- Select your branch for as compare
- Press "Create pull request"
- Name the pull request
Feature xxorFeature xx: A title describing changes - Write a description
- If you write
closes #xxorfixes #xx, issue xx will be linked to the PR and will close when the PR is merged. (All keywords)
- If you write
Code Review
After being assigned a pull request, the group should review the code under the Files changed tab. Look for code that may be deprecated, unnecessary, non-optimized or has weird formatting.
Start at https://github.com/aau-giraf/
- Choose repository eg. weekplanner.
- Click on the Pull Request tab.
- Choose an open pull request from the list.
- Click on the Files Changed Tab. All the changes can be seen in these files.

- Make a comment or suggestion on a single line or multiple lines by pressing
the blue + icon (move the cursor to a line).
The red square marks the selection icon which can be used to suggest code
that replaces the line(s).
 You can view what the author will see by clicking Preview.

- Make a comment or suggestion on a single line or multiple lines by pressing
the blue + icon (move the cursor to a line).
The red square marks the selection icon which can be used to suggest code
that replaces the line(s).
- Having looked over all the files, click Review changes.
- If you made comments, make sure the author looks them through by choosing
Request changes before clicking Submit review. If changes are made,
you have to re-review the pull request!

- If the changes makes sense, click Approve.

- If you made comments, make sure the author looks them through by choosing
Request changes before clicking Submit review. If changes are made,
you have to re-review the pull request!